

This Chocolate-Peppermint Angel Pie is a sophisticated dessert that balances the deep, bittersweet richness of cocoa and semisweet chocolate with the bright, cool aroma of peppermint. The base is a delicate, crisp meringue crust that adds a textural contrast to the airy, light-as-air chocolate mousse filling. Made with Neufchatel cheese for a subtle tang and reduced fat, it feels indulgent without being overly heavy. The filling is stabilized with gelatin and folded with a French-style meringue for extra volume and shine. It’s an elegant choice for holiday gatherings, dinner parties, or any special occasion where you want to impress guests with a professional-looking, homemade treat. Serve chilled for the best texture.
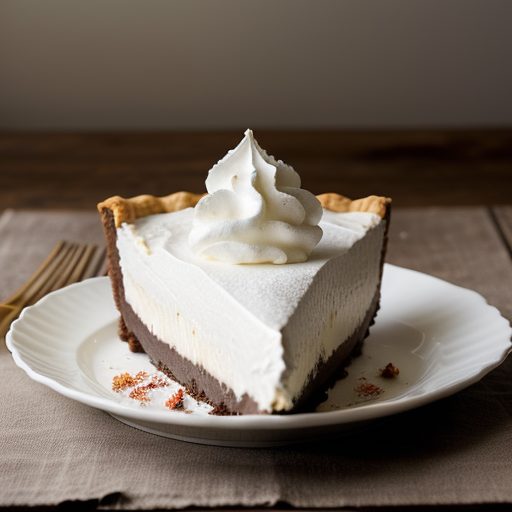
Chocolate-Peppermint Angel Pie
Description
This Chocolate-Peppermint Angel Pie is a sophisticated dessert that balances the deep, bittersweet richness of cocoa and semisweet chocolate with the bright, cool aroma of peppermint. The base is a delicate, crisp meringue crust that adds a textural contrast to the airy, light-as-air chocolate mousse filling. Made with Neufchatel cheese for a subtle tang and reduced fat, it feels indulgent without being overly heavy. The filling is stabilized with gelatin and folded with a French-style meringue for extra volume and shine. It's an elegant choice for holiday gatherings, dinner parties, or any special occasion where you want to impress guests with a professional-looking, homemade treat. Serve chilled for the best texture.Ingredients
Directions
-
Preheat oven to 275°F (135°C). Lightly oil a 9-inch pie plate and set aside.
-
In a large mixing bowl, combine egg whites, cream of tartar, and salt.
-
Beat with an electric mixer until soft peaks form.
-
Add 1/4 cup of the sugar and beat for 30 seconds.
-
Gradually beat in the remaining 1/2 cup sugar while mixing on medium speed.
-
Add vanilla extract and beat for 7 to 10 minutes longer, stopping occasionally to scrape down the sides of the bowl, until the meringue is stiff, shiny, and all sugar is dissolved.
-
Spread the meringue evenly over the bottom and up the sides of the prepared pie plate.
-
Use the back of a spoon to create decorative peaks along the rim.
-
Bake for 1 hour and 15 minutes, or until the crust is firm, crisp, and easily lifts from the pan.
-
Turn off the oven and let the crust cool completely inside with the door slightly ajar to prevent cracking. Store in an airtight container if making ahead.
-
For the filling: In a medium bowl, whisk together 1/4 cup milk, 1 whole egg, 1/3 cup corn syrup, and cocoa powder until smooth and lump-free.
-
In a heavy 2-quart saucepan, heat the remaining 3/4 cup milk until bubbles appear at the edges; remove from heat.
-
Whisk a small amount of the hot milk into the cocoa mixture to temper it, then pour the cocoa mixture into the saucepan with the remaining milk.
-
Cook over medium heat, stirring constantly with a wooden spoon, for 3 to 5 minutes, until the mixture is slightly thickened.
-
Remove from heat and whisk in the chopped semisweet chocolate and softened Neufchatel cheese until completely smooth. Set aside to cool slightly.
-
In a small saucepan, sprinkle gelatin over 1/4 cup water and let soften for 3 minutes.
-
Heat over low heat for 1 to 3 minutes, stirring until the gelatin is fully dissolved.
-
Whisk the dissolved gelatin, vanilla, and peppermint extract into the chocolate mixture. Set aside.
-
In a small saucepan, combine 1/4 cup water, 1/2 cup sugar, and 2 teaspoons corn syrup.
-
Bring to a boil and cook without stirring over medium-high heat for about 5 minutes, or until the syrup reaches 230°F (110°C) (thread stage).
-
While the syrup is heating, begin beating the 2 egg whites in a medium bowl with an electric mixer at medium-low speed.
-
Beat until soft peaks form, then beat at medium-high speed until stiff but not dry.
-
Continue boiling the syrup until it reaches 239°F (115°C) (soft-ball stage).
-
With the mixer running at medium-high speed, gradually pour the hot syrup in a thin stream over the beaten egg whites.
-
Beat at medium speed for about 5 minutes longer, or until the meringue is stiff, satiny, and cool to the touch.
-
Whisk about 1 cup of the prepared meringue into the chocolate mixture to lighten it.
-
Gently fold in the remaining meringue until no white streaks remain.
-
Pour the filling into the prepared meringue crust, spreading it to the edges and smoothing the top.
-
Cover loosely with plastic wrap and refrigerate for at least 3 hours, or up to 8 hours, until the filling is firmly set.
-
For garnish: Warm the 1 ounce semisweet chocolate in the microwave at medium-low power for 1 to 2 minutes, just until softened but not melted.
-
Alternatively, warm it in a 250°F (121°C) oven for 3 to 5 minutes.
-
Using a vegetable peeler, shave curls from the softened chocolate onto a sheet of wax paper.
-
Arrange the chocolate curls decoratively over the top of the chilled pie just before serving.
Nutrition Facts
Servings 10
- Amount Per Serving
- Calories 123kcal
- % Daily Value *
- Total Fat 5.3g9%
- Saturated Fat 3.1g16%
- Cholesterol 9mg3%
- Sodium 95mg4%
- Total Carbohydrate 17.3g6%
- Dietary Fiber 2.1g9%
- Sugars 13.3g
- Protein 2.7g6%
* Percent Daily Values are based on a 2,000 calorie diet. Your daily value may be higher or lower depending on your calorie needs.
